FAQ:
How to configure Stripe payment gateway?
To configure Stripe payment gateway,
- At first, create a developer account from stripe developer dashboard (https://dashboard.stripe.com/)
- log in to that account
- Then go to the
Developer -> API Keyssection and on that section create an API key. After creating, you'll get oneSecret keyand onePublishable key.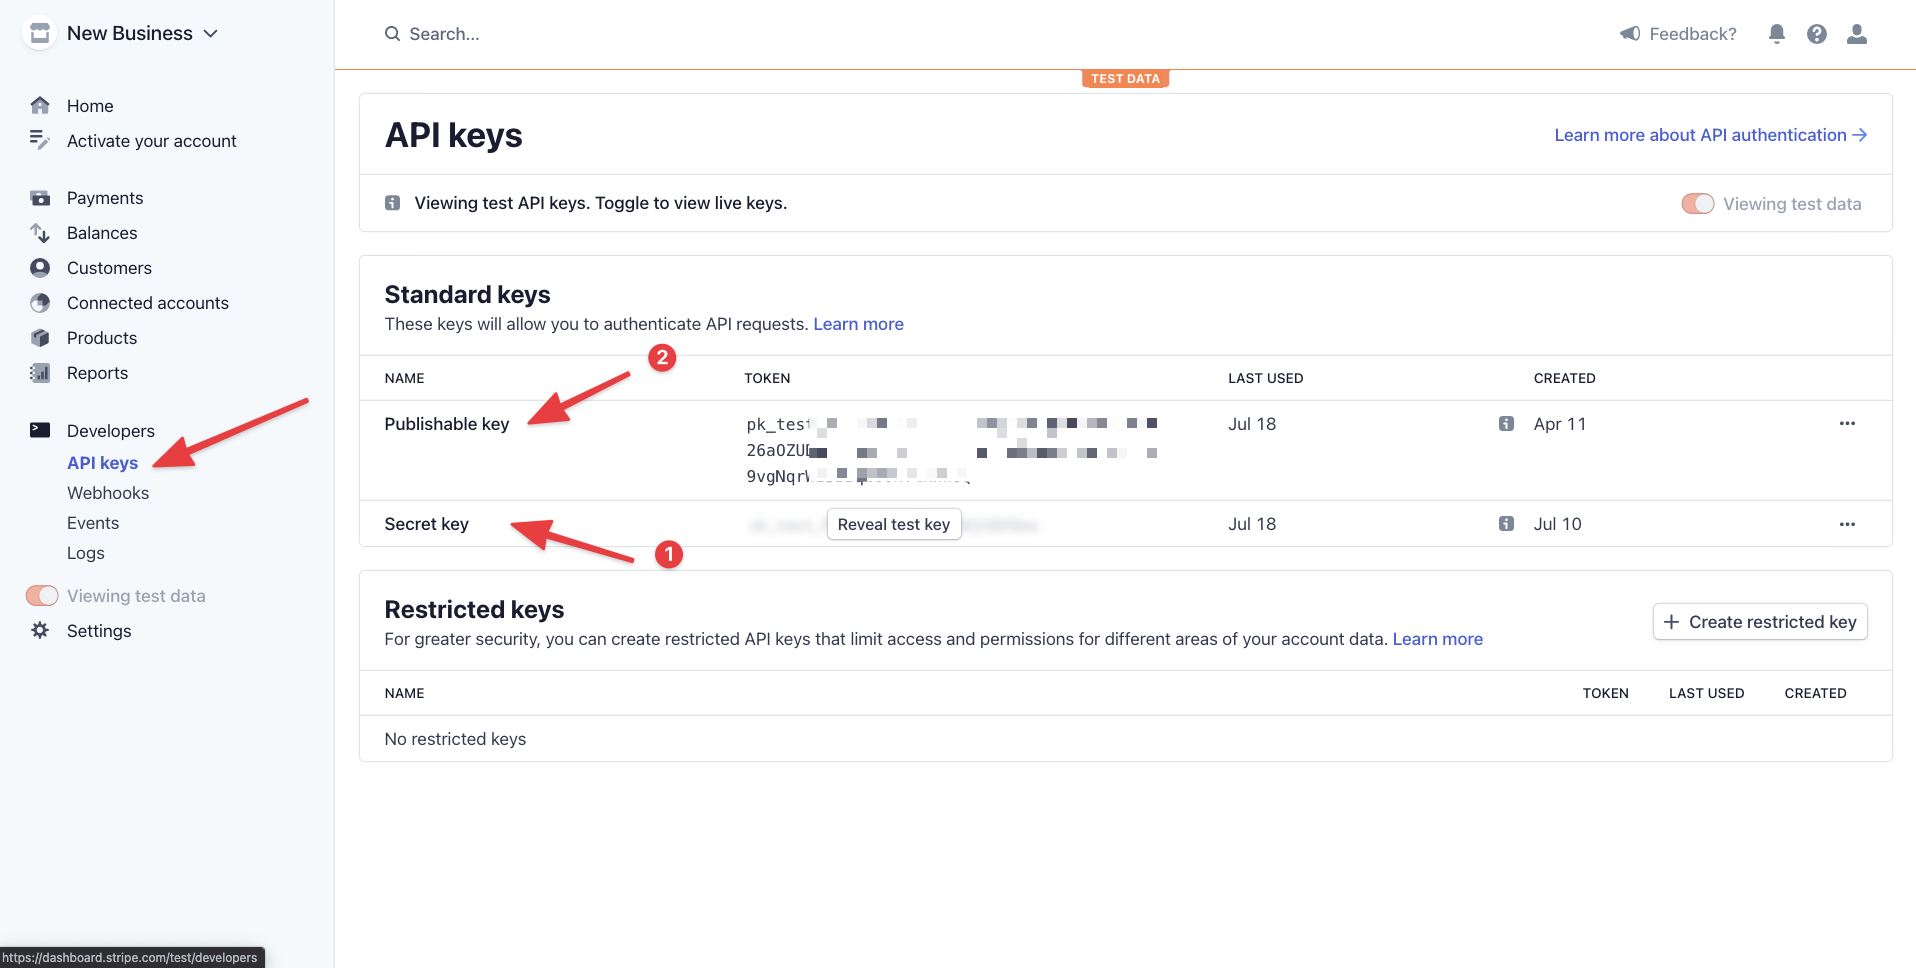
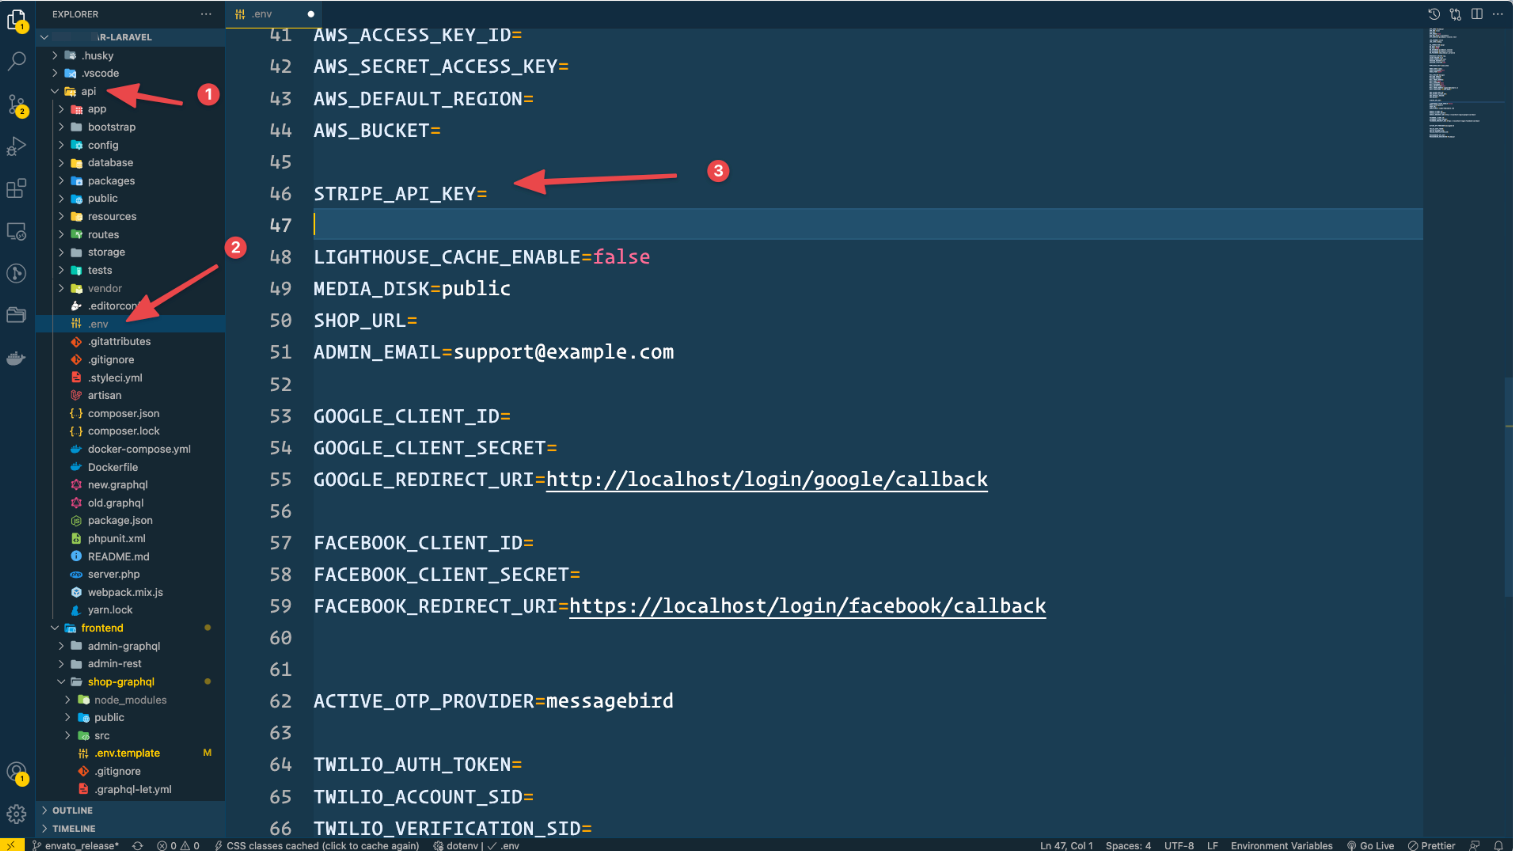
- Then copy
Secret keyto yourpixerapi->.env
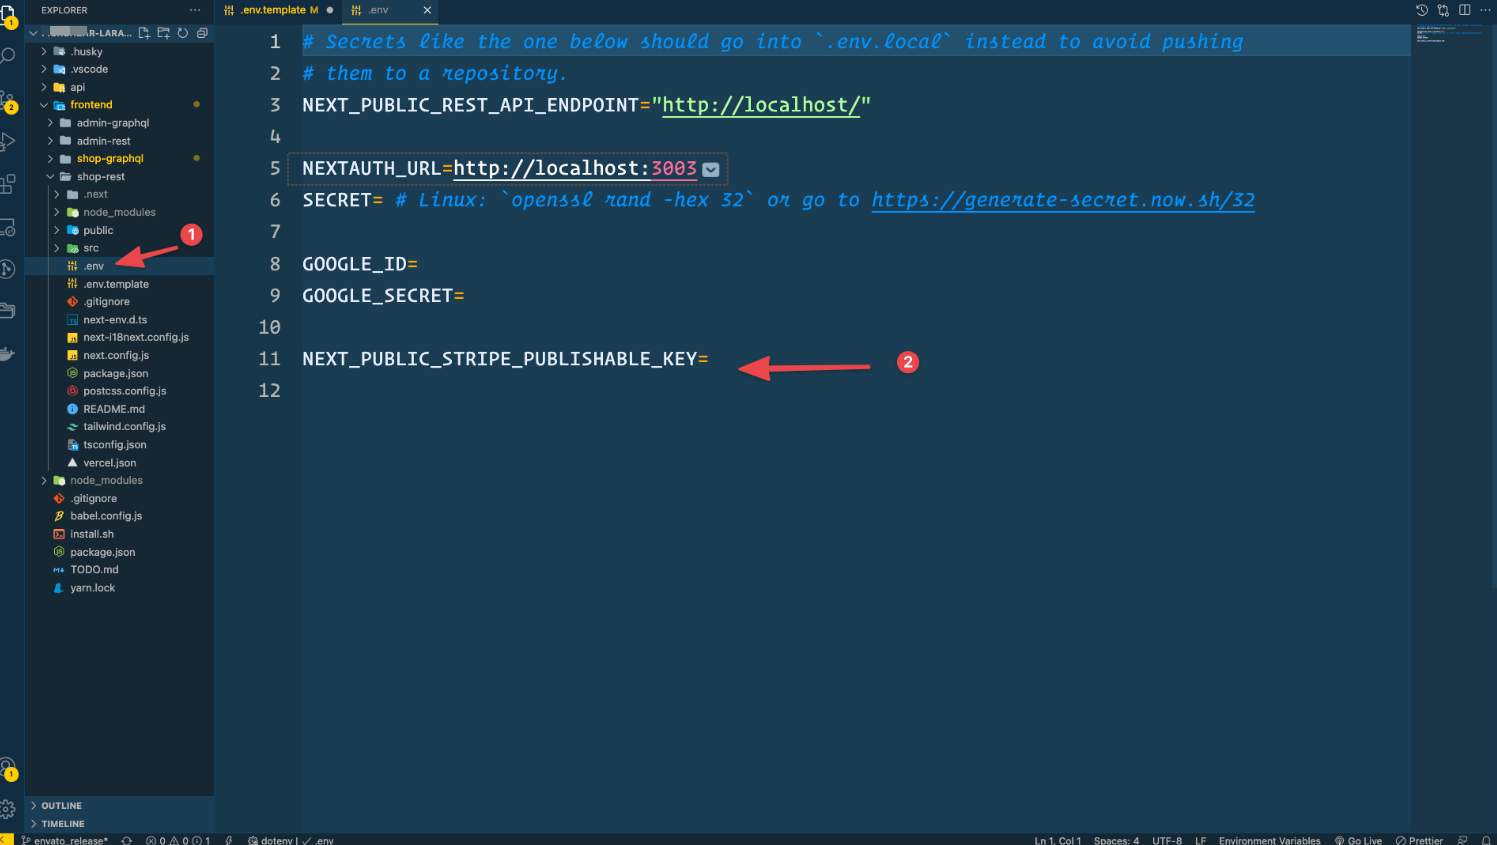
- And similarly, add
Publishable keyto yourshop -> .env
After configuration, make sure you rebuild your project using this command,
yarn build
Why am I facing "You may need an appropriate loader to handle this file type" during running shop?
Ans: Please remove node_modules from shop then yarn then run yarn dev
I am changing schema files but changes is not working
Your changes might not work because schema is cached. SO you might need to clear schema cache using the below command php artisan lighthouse:clear-cache.
Changing .env files but not getting the changes
Run Below command php artisan optimize:clear
Changing route but not getting the changes.
Run php artisan optimize:clear or php artisan route:clear
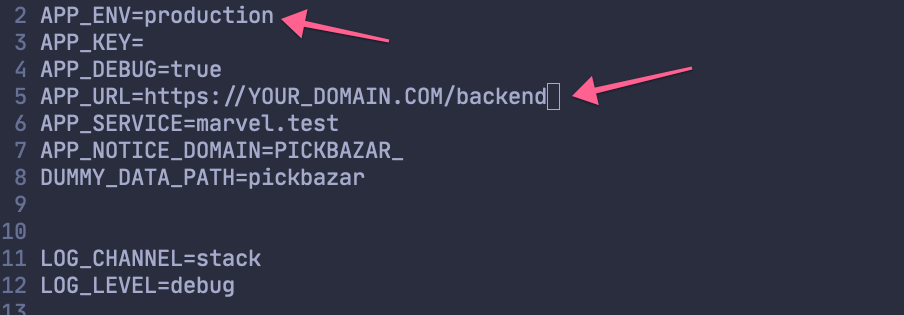
I have set STRIPE_API_KEY in .env but still getting error.
In some cases STRIPE_API_KEY value can't read from .env in those cases you have to put the key in the config file directly in api/packages/marvel/src/Config/laravel-omnipay.php
Getting error on forget password email sending Make sure you have run the
php artisan marvel:installcommands successfully and copied the necessary email templates to your resources folder. You can also do it byphp artisan marvel:copy-filescommand.NB: This same issue can occur during order creation.
Can I use it with my existing laravel?
Yes, you can. Follow the below steps.
- Make sure you are using laravel 8.
- Copy
api/packagesfolder from the downloaded files into your laravel root folder. - Put below code in your laravel
composer.jsonfile intorequiresection.
"ignited/laravel-omnipay": "dev-master","omnipay/common": "dev-master","omnipay/stripe": "dev-master","pixer/shop": "dev-master"
- Put below code in bottom of your
composer.json. If you already have anrepositoriessection then put code insiderepositoriesto your existingrepositories
"repositories": {"pixer/shop": {"type": "path","url": "packages/marvel"},"ignited/laravel-omnipay": {"type": "path","url": "packages/laravel-omnipay"},"omnipay/common": {"type": "path","url": "packages/omnipay-common"},"omnipay/stripe": {"type": "path","url": "packages/omnipay-stripe"}}
- Now run
composer install - Copy necessary env variables from .env.example to you env file.
- Run
php artisan marvel:installand follow necessary steps. - To run server
php artisan serve - For image upload to work properly you need to run
php artisan storage:link.
Why am I getting Access denied for user?
navigate to api then run ./vendor/bin/php down -v. It will delete any of your existing mysql volumes. Now run ./vendor/bin/php up -d on same directory or run bash install.sh on root directory
Why am I getting permission issue during deployment?
Run below commands for fixing permission issue in your laravel app during deployment
sudo chown -R $USER:www-data storagesudo chown -R $USER:www-data bootstrap/cachesudo chown -R www-data:www-data storagesudo chown -R www-data:www-data bootstrap/cache
Why am I getting "The GET method is not supported for this route. Supported methods: HEAD"?
Run php artisan optimize:clear
How to resolve the Load More Infinity loading issue?
If you click on the Load More button and the button is spinning continuously, then check API request from the network tab. If it is HTTP and your API is hosted on HTTPS, then open,
pixer-api/app/Providers/AppServiceProvider.php
And add this code to boot method,
if (!\App::environment('local')) {$this->app['request']->server->set('HTTPS', true);}
I'm trying to upload images, but the images are not displayed on the frontend?
We support two types of file uploads; one is local, and another is AWS S3.
Both uploading systems follow this procedure,
API
At first, add your API URL to your pixer-api -> .env.
If you're using windows and your API is running with ports like
localhost:8000or127.0.0.1:8000, then make sure you add the domain with port toAPP_URL.Like thisAPI_URL=http://localhost:8000
After that, clear your API cache by using this command from the pixer-api folder,
php artisan optimize:clear
Then link the storage system by using this command,
php artisan storage:link
If you're using AWS S3, then update
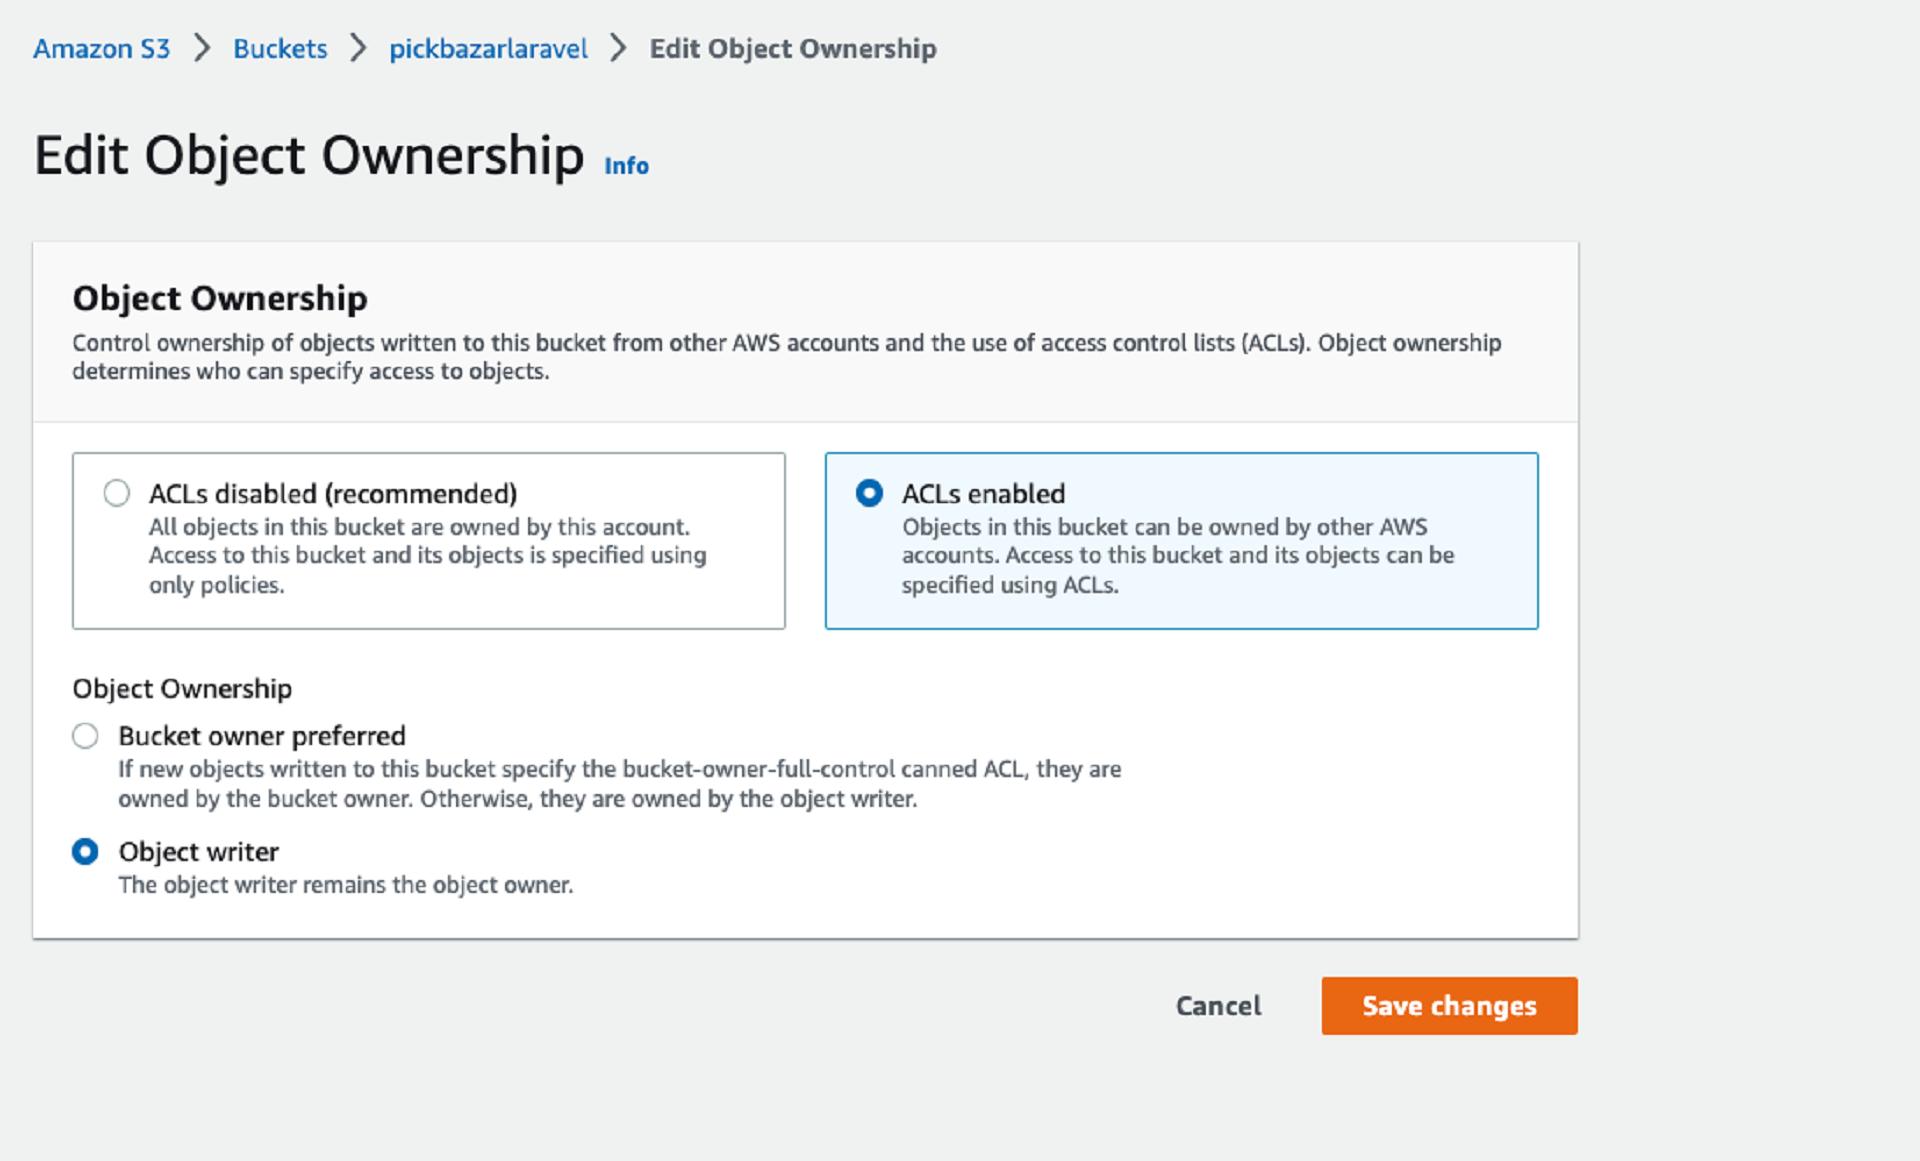
MEDIA_DISK=s3and add allAWS_credentials For AWS s3, make sure your properly setup permission of the bucket with ACL enable by follow this link -> https://stackoverflow.com/a/70603995/2158023
Admin
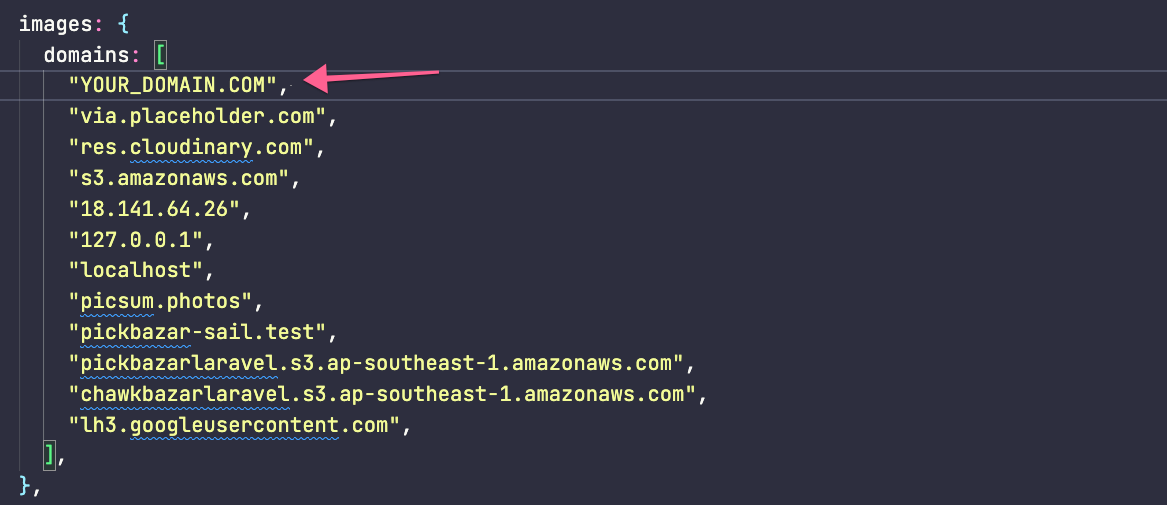
Then add your domain to your pixer-laravel -> admin -> next.config.js
If you're using
AWS S3, then also add your root S3 domain like this,

Shop
Similarly, add your domain to your pixer-laravel -> shop -> next.config.js
If you're using
AWS S3, then also add your root S3 domain like this,
Build Frontend,
If you run in dev mode, then re-run will affect your update. But if you're running as a production mode, then you've to rebuild the project and re-run again. Otherwise, image upload will not work.
After building the project, replace your server shop and admin folder using this rebuild folder and re-run the app using this command,
pm2 restart all
After that, make sure you rebuild the frontend part and upload it to your server again.
How to resolve the 502 Bad Gateway error for frontend/admin?
There can be several reasons that throw 502 errors for the frontend in the production server.
Reason 1:
On your Nginx file, a specific port is set for shop or the admin, so when you run the script as a PM2` instance, the script has to be run that specific port; otherwise, your domain/subdomain will throw a 502 error.
PORT:
3000 -> Shop Rest3001 -> Admin Rest
To check that at the first stop the PM2 instance by this command,
pm2 stop 'all'
then go to the pixer folder from your server and try to run the script using yarn and check which port it is running,
From admin directory
yarn start
From shop directory
yarn start
And, check if the port matched with the Nginx port or not? If not matched, then change the port to Nginx config.
Reason 2:
To check that at the first stop the PM2 instance by this command,
pm2 stop 'all'
then go to the pixer folder from your server and try to run the script using yarn and check which port it is running,
From admin directory
yarn start
From shop directory
yarn shop
With this command, it'll give you an error that no build file is found. To resolve that, rebuild your project and then rerun the scripts.
https://pixer-doc.vercel.app/vps-server#frontend-project-build
How to resolve javascript heap out of memory issue?
If you're using cPanel based server, then you maybe get an error like "call_and_retry_last allocation failed - javascript heap out of memory".
To resolve that issue, you've to add a limit of the memory bound,
Please check this,
https://stackoverflow.com/questions/38558989/node-js-heap-out-of-memory
https://support.snyk.io/hc/en-us/articles/360002046418-JavaScript-heap-out-of-memory
https://blog.openreplay.com/javascript-heap-out-of-memory-error
Image upload throw Internal Server Error; how to resolve that?
For uploading, the php8.1-gd library is required. So make sure you install the php8.1-gd library on your server.
How to resolve docker invalid reference format: repository name must be lowercase?
To resolve that issue, you've to move the laravel-ecommerce folder from Pixer Laravel - React Next REST Ecommerce to a genric folder where you store your code. After that, use this command from your laravel-ecommerce folder,
chmod +x install.shbash install.sh
Sometimes my server shutdown or halts automatically. After restart, it works fine again; how to resolve that?
In general, this happens mainly when your upstream server fails to handle its processing power when there is lots of traffic or requires lots of operation. Please upgrade your server configuration to double to check the issue. Please check this video,
https://www.youtube.com/watch?v=4pIqAz5bzX0
If that doesn't solve the issue, then you've to redeploy again with a new ec2 instance.
S3 uploading doesn't work after adding credentials to .env; how to resolve that?
For AWS s3, make sure your properly setup permission of the bucket with ACL enable by follow this link
https://stackoverflow.com/a/70603995/2158023
How to rebuild the project?
When you upload the code to the server as a production, NextJS fetch its code from the build file. So after deployed, when you update or change code on scripts, the updated scripts don't work at the front end until you rebuild the project again. NextJs works this way.
Now there are two ways you can follow to rebuild the project,
If your server has more than 2+ CPU core and 6GB+ of memory, then you can directly edit code at your server then rebuild the project from the server directly using this command,
For shop,
Go to /var/www/pixer-laravel/shop
yarn build
And for admin,
Go to /var/www/pixer-laravel/admin
yarn build
After completing the build, restart the PM2 process using this command,
pm2 restart 'all'
But suppose your server doesn't have that processing power, and you try to build your scripts directly from the server. In that case, your server will be shut down during the build, and you've to restart the server.
In that case, you can rebuild the scripts at your local computer and upload them to your server. If you follow our VPS Server Deployment guide, then you already know the process. To build the scripts on your pc, follow this procedure,
At first, download the pixer-laravel folder from the server to your computer, and customize the code at your computer.
Then to build shop, go to shop folder and use this command,
To install all the packages,
yarn
Then build the shop,
yarn build
Then to build the admin, go to admin folder and use this command,
To install all the packages,
yarn
yarn build
Then delete the shop and admin folder from the server and upload your build shop and admin folder to the server at the exact same location and use this command to restart the PM2,
pm2 restart 'all'
How to increase upload size?
The API supports 10MB of upload limit for a single file by default. If your upload file is more than 10MB, then please follow this,
At first, login to the server using ssh, and then,
Edit,
/etc/php/8.1/fpm/php.ini
Then update,
upload_max_filesize = 256Mpost_max_size = 256Mmax_execution_time = 300
Then restart the PHP,
sudo service php8.1-fpm restart
After that update,
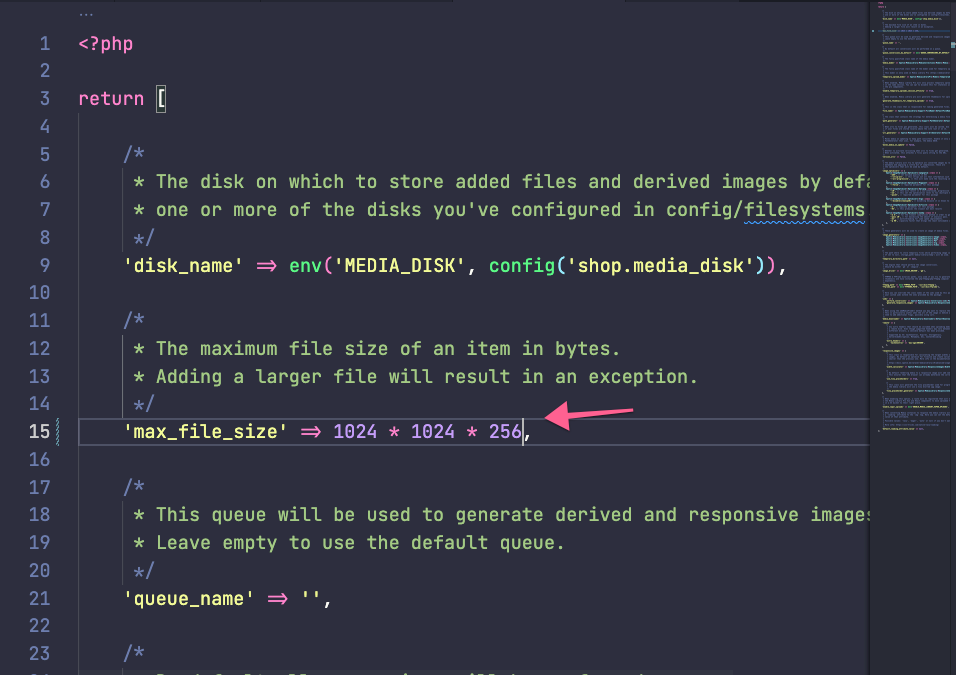
pixer-api/packages/marvel/config/media-library.php
'max_file_size' => 1024 * 1024 * 256,
After that, run this command from the pixer-api. folder,
php artisan optimize:clear
And for admin, increase timeout from,
admin/data/client/http-client.ts
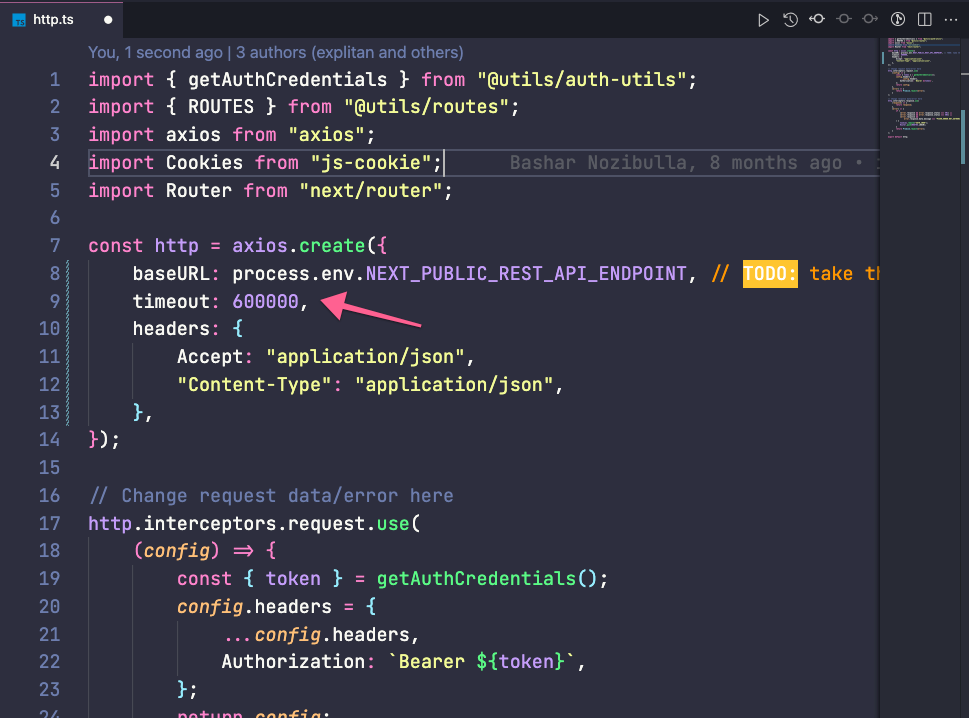
timeout: 600000
After that Rebuild Your Project and restart again.
How to resolve docker: invalid reference format: repository name must be lowercase.?
Please open your terminal and use this command,
brew services stop mysql
It'll stop any MySQL instance that is installed using brew.
Then use this command to check is there MySQL running or not,
mysql -v
If no MySQL is running then, go to,
pixer-laravel -> pixer-api
and use this command,
./vendor/bin/sail down -v
After that,
Open docker dashboard and delete all the existing container and images,
And after that remove,
pixer-laravel -> pixer-api -> .env
And then go to your root pixer-laravel folder and use this command again,
chmod +x install.shbash install.sh
What type of stripe payment support in pixer?
Pixer only supports a card-based payment system, so if your country doesn't support a card-based payment system, then you've to customize the script to implement another payment system in stripe.
How to remove the existing payment gateway?
You can remove the Stripe Payment from the available payment array,
shop/src/components/checkout/payment/payment-grid.tsx
How do I log in to the admin panel as the main administrator?
When you install the API using php artisan marvel:install or using bash install.sh(docker), you'll get a prompt to create an admin account, and you've to create admin credentials that time. And then, you can use that credentials for the main admin account.
How to upgrade the existing deployed laravel 8 server to laravel 9?
At first, remove all the existing php 7.4 and its extensions by using this command,
sudo apt purge php-fpm php-mysqlsudo apt purge php-mbstring php-xml php-bcmath php-simplexml php-intl php-mbstring php7.4-gd php7.4-curl php7.4-zip composer
Then remove the composer,
sudo rm /usr/bin/composer
Then delete the vendor folder from the pixer-laravel -> api folder.
cd /var/www/pixer-laravel/apisudo chown -R $USER:www-data storagesudo chown -R $USER:www-data bootstrap/cacherm vendor -rf
Then install PHP 8, and its extensions,
sudo add-apt-repository ppa:ondrej/phpsudo apt update
sudo apt install php8.0-fpm php8.0-mysql
sudo apt install php8.0-mbstring php8.0-xml php8.0-bcmath php8.0-simplexml php8.0-intl php8.0-mbstring php8.0-gd php8.0-curl php8.0-zip
php -r "copy('https://getcomposer.org/installer', 'composer-setup.php');"php -r "if (hash_file('sha384', 'composer-setup.php') === 'e21205b207c3ff031906575712edab6f13eb0b361f2085f1f1237b7126d785e826a450292b6cfd1d64d92e6563bbde02') { echo 'Installer verified'; } else { echo 'Installer corrupt'; unlink('composer-setup.php'); } echo PHP_EOL;"php composer-setup.phpphp -r "unlink('composer-setup.php');"
sudo mv composer.phar /usr/bin/composer
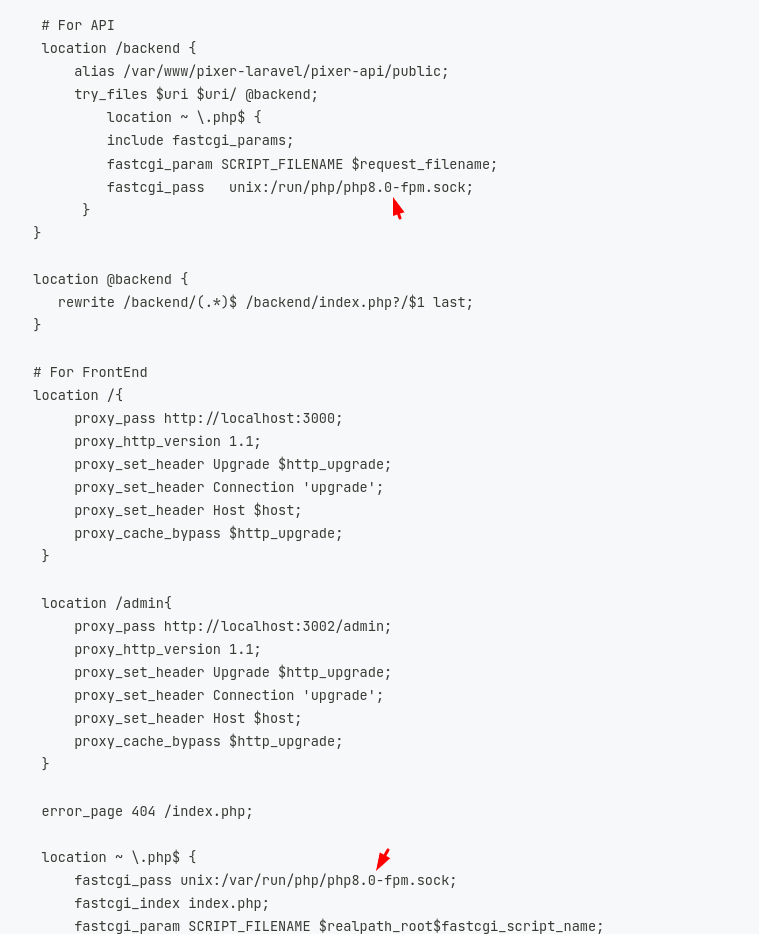
Then update 7.4 fpm to 8.0 fpm from,
/etc/nginx/sites-enabled/pixer
Then install composer packages,
cd /var/www/pixer-laravel/api
composer install
php artisan optimize:clear
php artisan marvel:install
php artisan marvel:install will remove all of your existing data. Ensure you export or backup your data before using that command.
sudo chown -R www-data:www-data storagesudo chown -R www-data:www-data bootstrap/cache